Sparkrock 365 Sandbox Creation Guide


- Sign-in to your production instance of Sparkrock365.
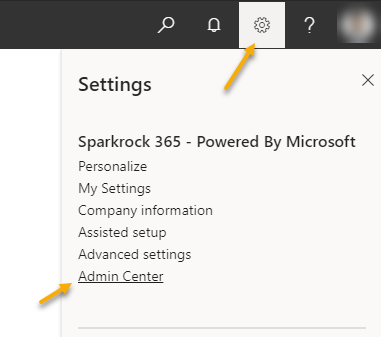
- Choose the settings icon (gear) at the top and select ‘Admin Center’ (Note, this will only appear if you are an Administrator).
- If there are sandbox environments already, you can click on its name from the list of environments to view more details.
- To delete a sandbox environment, select ‘Delete’ from the top ribbon and confirm to remove the environment. Ensure you do not accidentally delete production.
- Click on ‘Environments’ in the left navigation bar to return to the list of environments, and select ‘Production’ from the list of environments.
- In the top ribbon, click on 'Copy'.
- In the tab that opens, choose a name for the new environment, and select 'Copy'.
- Important: At this point, you might want to name the new sandbox 'PTS' (without the quotation marks). This will trigger the automatic creation of a MySparkrock instance.
- To connect the new PTS mySparkrock instance, you will need to change the URL in the new sandbox to point to https://customer-pts.mysparkrock.com/ where customer is your company acronym. For more information check KA-03550 · Customer Self-Service (sparkrock.com)
- Once the sandbox is created, if you click on its name from the environment list, it will display details about the environment. If the sandbox is intended to be upgraded, please provide the full URL to Sparkrock.

